EarthbagBuilding.com
Sharing information and promoting earthbag building
| Home | History | Resources | Slide Show |
| About Us | Projects | Plans | Videos |
| Blog | FAQ's | Workshops | Testing |
| Search | Articles | Bulletin Board | Shelter |
| Questions about the Earthbag/Papercrete Home Questions answered by Kelly Hart |
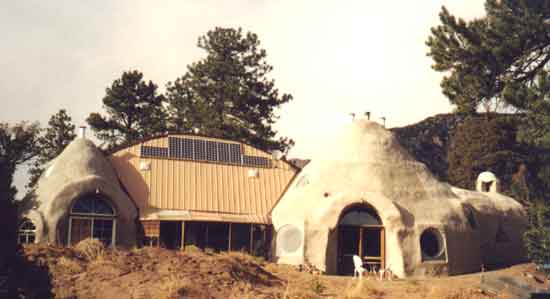
Q: I was wondering, why you choose earthbags over the other choices you have obviously researched. A: At the time that I was designing my house, I also was exposed to a variety of interesting alternative approaches to building, and decided to experiment with some of them. I was intrigued with earthbags for several reasons: they can be filled with natural, earthen materials; they can be flexibly arranged into a wide range of shapes; if protected from the sun, the bags and their contents will not rot over time; they can be fashioned into domes, so that other tensile roof materials are not needed; they are inexpensive; they are simple to use without much experience. Q: Could you briefly outline the main construction challenges of building your earthbag house? Another challenge was that my design called for a rather large (30' X 20') elliptical dome as part of the structure. This is larger than anything attempted before with earthbags, as far as I know. Would this be possible? I didn't know. At first I tried making this as a free-standing stack of bags...and it started to deform by the time I nearly had it completed. So I had to dismantle much of it and start over with a pole-frame internal support structure. Another challenge was creating the arched span over the 6' doorways with earthbags...again something that had never been done before. Also I spanned the six-foot vaulted entry to the house with earthbags...not easily done. Then there was the challenge of designing the two-story earthbag connecting space between the two primary domes with the entire earthbag portion both resting on the existing domes and on wood-framed supports on one side. A whole other unknown was how papercrete would function as an external and internal plaster over the bags. This material is virtually untested in this application. Just making the mixer for the papercrete was a big job. Of course another major challenge was that I accomplished virtually all of this by myself, without the benefit of a crew for assistance. It took me about three years to build this house. Q: Are you happy with how your earthbag/papercrete house is working out? A: I am quite satisfied with how our house is working. We have had no water problems at all. The papercrete has been holding up pretty well, but after about five years is showing signs of erosion in areas that are hard hit by storms. I would basically build the house the same way if I were to start over again today, although I might put a finish coat of harder stucco over the papercrete. Another change I would make is to make the larger dome circular instead of oblong, because the circular shape is much more stable and I wouldn't have to deal with the unequal forces that the oblong shape creates. I am especially pleased with the thermal efficiency of the house. It is comfortable both winter and summer. I'm sure this is because I filled the bags with the crushed volcanic rock that is available in our area. Q: How do you heat your house? A: The house is designed for passive solar heating, and that works pretty well when we have sun, but on extremely cold days, or during overcast weather, we have both a wood stove and a couple of small propane direct-vented heaters in the bedroom and in one of the offices. We also have solar hot water in the hot tub and preheating the domestic hot water, and this heat can also be used for supplementary heat. Q: Is it practical for a man nudging 60 to attempt this project on his own? One advantage - unlimited time (I hope!) A: Hey, I'm nudging 60 and I did it! Q: I am interested in building an earthbag home. Are you aware of any builders who can construct a home in Florida? My husband and I saw your home on HGTV, but realize that it took you 3 years of working full time on your home. We would not be able to make that kind of time investment. If you have know of any builders to refer us to I would appreciate it. A: It did take me that long to build my home, but I did 95% of it by myself, which most people wouldn't do. Earthbag building could proceed nearly as fast as other methods of building, if a crew is organized and experienced. Unfortunately finding such a crew would likely be difficult, because building this way is not very well known. The best you could expect is to find a local builder who is willing to help you and willing to learn how to build this way himself...or to train the crew yourself. It is not difficult to learn how to do, but does require some special knowledge. Q: I have been considering taking a class at CalEarth on superadobe, but the price is quite hefty for someone my age (24). I have been checking out your site and thought I'd ask if you think it necessary to take this class or if it is also quite possible to build a sturdy earthbag home through book and internet research and experimentation? A: I built my earthbag home without the benefit of one of the CalEarth workshops (partly for the same reason that you mention), but I am pretty comfortable with experimenting with various construction technologies and have a lot of experience in doing this. Q: I am interested in combining homes of super adobe, bags, earth and papercrete. What kind of costs for about 800 sq ft? A: Earthbag building can be one of the least expensive ways to go, since the materials themselves are fairly inexpensive. It is all of the other things that most structures need that add up to more money, so the walls are just part of the cost. I built my earthbag/papercrete house for $16/sf, about ten years ago...but I did almost all of the work myself, and I am very good at scrounging for supplies...and it took me three years to do so. Q: How has the papercrete plaster on your earthbag house stood the test of time? A: Overall, the structure is as sound as the day I finished it. I'm sure there were also a few cracks in the PC plaster that developed over time, but I never worried much about them because of the nature of the wall system employed. Q: If I were to use scoria or another insulating material (have been looking into ways to use perlite, for example), would this material be piled against the exposed bag? How do you keep the material in this envelope while backfilling? It seems there might be some challenge to keeping the material at a consistent thickness to the height of where the plastic sheeting comes out of the wall while you are backfilling. Any advice on this process would be illuminating. A: As I recall, when I did this I did the backfilling in stages. At the point when the bag wall was up at about the height where the plastic apron would be tucked between the bags, I laid the plastic out over the berm material so that the space between the plastic and the wall could be filled with scoria. Then I added more berm soil and scoria (maybe a foot) and tamped it in place. I continued this process until the entire area was filled and I could lay the plastic over the bag wall and continue going up. |
 |
See Your Ad |
Disclaimer of Liability and Warranty
We specifically disclaim any warranty, either expressed or implied, concerning the information on these pages. No one associated with this site will have liability for loss, damage, or injury, resulting from the use of any information found on this or any other page at this site.
For Email contact go to About Us
We are interested in communication from others who are exploring the possibilities inherent with earthbag building.
Visit Our Other Websites:
www.greenhomebuilding.com
www.dreamgreenhomes.com
www.naturalbuildingblog.com