| The Earthbag/Papercrete Home of Kelly and Rosana Hart |
|||||||||||||||||||||||||||||||||||||||||||||||||||
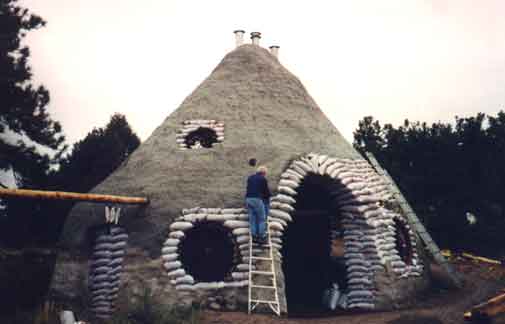
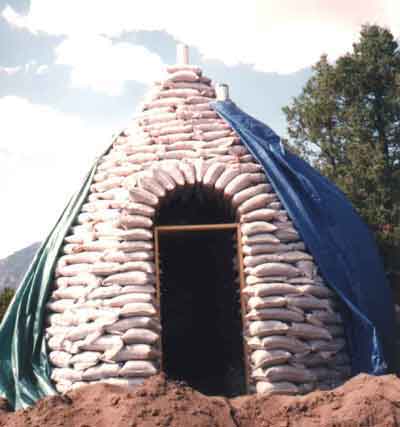 This is our first experimental earthbag dome. The interior diameter is 14 feet and the dome stands about 16 feet high. At first we tried filling the bags with the fine sand that it is built upon, but when we were partly done, the dome fell in because the sand couldn't hold the shape. Then we filled the bags with crushed volcanic rock (scoria) that provides better insulation and holds its shape much better. The arch over the doorway was created with a wooden form that was later removed. We kept the dome tarped most of the time until we papercreted the exterior. We did this to keep the sunlight off the bags because the UV will eventually destroy the bags.
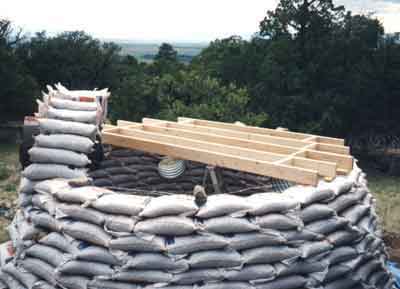
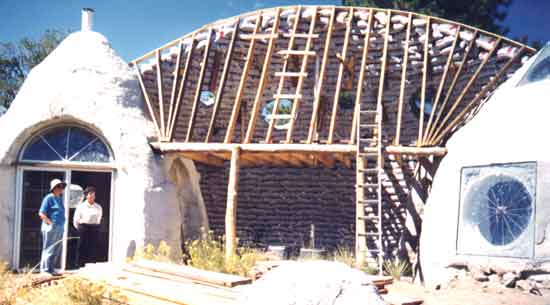
Here is the same dome as above, with joists in place for the loft and with the arch form still supporting the entrance arch. The joists are simply resting on the bags and blocked up where necessary to maintain the level. Bags are then stacked between the joists and on top of them to lock them into place. Having the loft there made the structure much more sturdy as I continued to build. Two strands of four-point barbed wire were placed between each course of bags to help hold them in place and to withstand any tendency for the dome to bulge outward with pressure from above. We also placed a piece of baling twine under each bag which would be tied around three bags eventually. This provided more structural integrity and created a positive grip for any final plaster material.
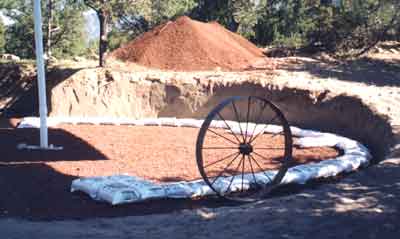
This is the beginning of the large elliptical dome that became our kitchen and living room. It measures approximately 30 feet on the long axis and 20 feet on the short axis. Because we are building on sand with excellent drainage and no problem of frost upheaval, there is no foundation other than a pad of 6 to 8 inches of the crushed volcanic rock (scoria). You can see the pile of scoria in the background, and a large wagon wheel in the foreground that will be used to support a circular window opening.
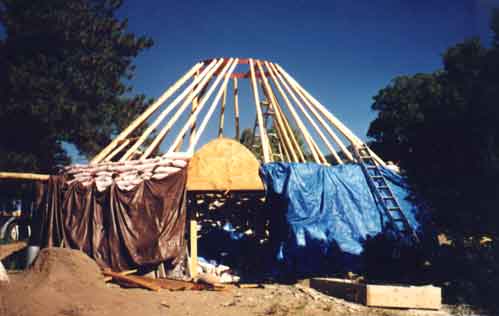
Because of the elliptical shape, this dome required a rigid pole framework to help support the second story. I would not recommend building anything but a circular dome after this experience, because otherwise the forces are just not balanced enough. You see the large arch form for the six-foot wide doorway. The house is a passive solar design, so we needed large openings to let in the sunlight. After several failures and much experimenting, we devised a double bag technique to create such a large arch. Double, side by side, bags are used for columns at every doorway in the house.
Here I am applying a coating of papercrete to the outside of the large dome. I did this as soon as I could to protect the bags. Thermal pane glass was embedded in the papercrete on the outside over all of the circular windows.
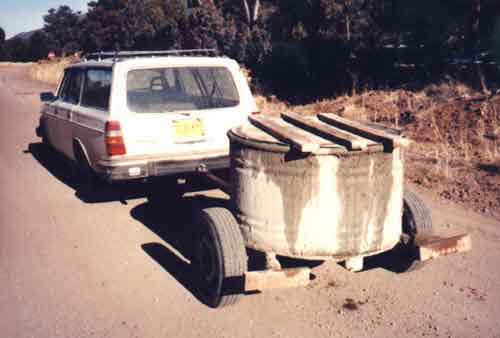
This is the papercrete tow mixer that was used to mix most of the papercrete. An invention of Mike McCain, the tow mixer is an amazing machine. It is made from a car rear end, a metal stock tank, a lawnmower blade and a few other parts. To make the papercrete, water is filled to within about 6 inches of the top, sand is added if desired, dry paper of virtually any description is added, and one bag of portland cement thrown in. One slow trip driving around the block produces a thick slurry that is total mush. This is drained through a sieve to eliminate the excess water, and then applied to the building. One mixer load yields between three and four wheelbarrows full of papercrete.
On the left is the 16 foot interior diameter bedroom dome, and on the right is part of the large dome. Between them is the connecting portion of the house under construction. The back (north) bag wall is a section of a sphere that is braced into place with the rafters for the southern roof/wall. Other braces within the attic space help hold the shape.
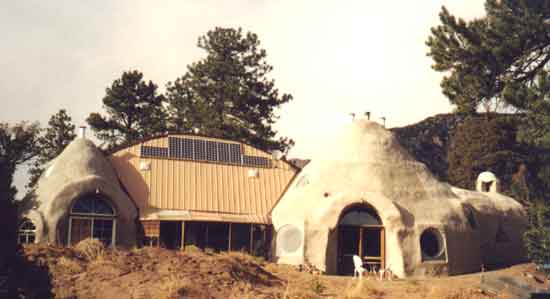
This is the southern aspect of the house after the final papercrete stucco was applied. The section of roof between the domes is covered with metal roofing and supports an array of eight photovoltaic panels. (That's why we needed a straight surface.) Solar water heating panels will be mounted below them. Beneath this roof is a bay of windows that extends outward to create a greenhouse space.
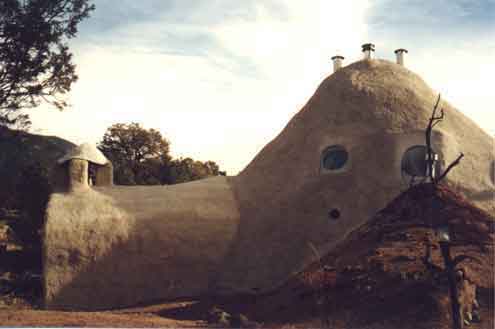
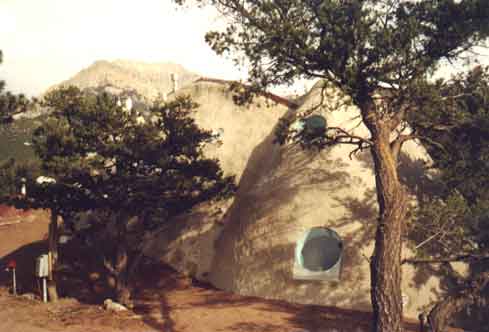
This view from the north shows the earthbag vault entryway/mudroom with its bell tower. The mound in the foreground is a completely bermed pantry that is accessible inside, from the kitchen. On top of the large dome are two air vents and a stove pipe. There are also three inlet air vents elsewhere in the dome.
This view of the back of the house shows how well it fits into the landscape. The curved shapes blend in with the mountains in the far distance.
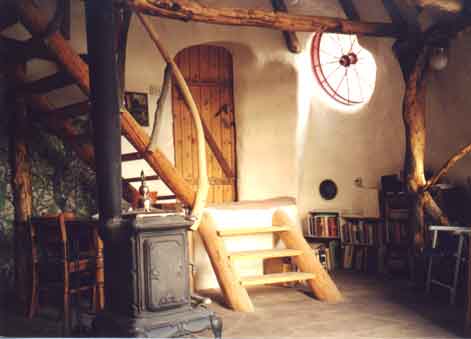
This shows the main entrance onto a landing, with the option of going up to the loft or down to the main level. Lots of natural wood was used to finish the interior components. An old wood stove for back-up heat is visible in the foreground.
The flight of steps lead up to the loft over the kitchen. The lodge poles that help support the dome's shape can be seen with the final coat of lime plaster that was troweled on between them. The horizontal band of logs between each lodge pole was positioned to brace the structure rigidly when a steel cable was tightened around at the same level.
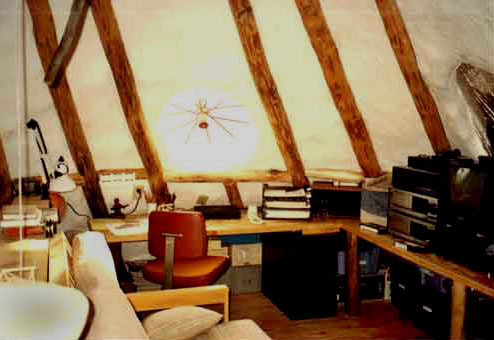
This is a view of Kelly's office space in the loft over the kitchen. Because the walls angle in rather sharply, the standing floor space is diminished. A built-in counter around most of the wall provides desk and equipment space, with lots of storage beneath it.
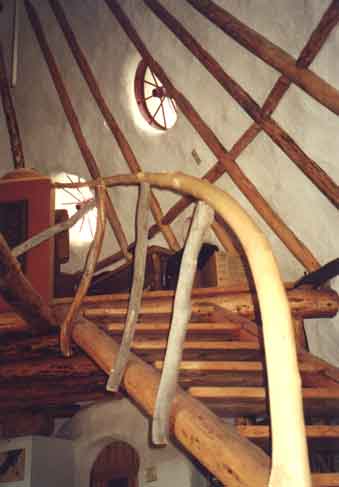
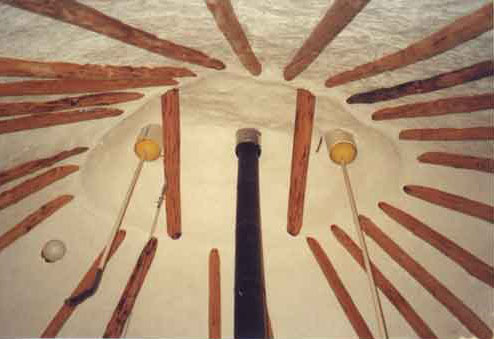
This is looking straight up from near the wood stove. You get almost a teepee feeling from the shape and the lodge poles. The two air vents are sealed with tether balls inflated to just the right size to fit snugly into the pipes. Long handles are attached to the balls to insert and remove them.
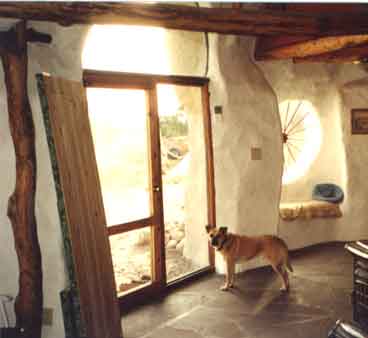
This is the view from the landing down into the living room. One of our dogs is standing on the flagstone set into the adobe floor. The rest of the floor in the large dome is poured adobe that was scored with a rocklike pattern. This is a classic passive solar arrangement, with lots of south-facing glass and dark colored thermal mass on the floor to absorb the heat. A window seat can be seen behind the dog, under the wagon wheel window. This seat was formed during construction with earthbags.
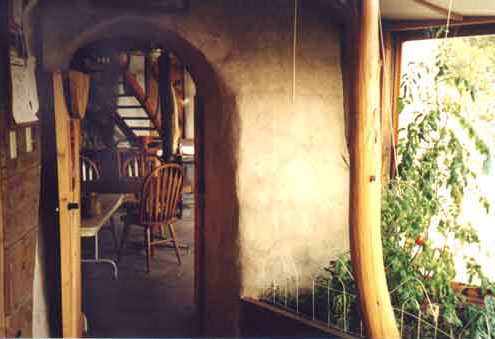
This is looking toward the large dome from the greenhouse in the connecting space. The tomatoes are happy. The wall next to the planter is papercrete stucco that was troweled smooth. A natural vertical log supports the horizontal beam that supports the entire south side of the attic.
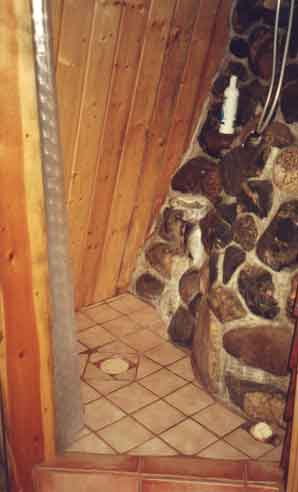
A view of our shower stall made with natural local stone, tile and wood. This was a little tricky because of all the odd angles in the space, but it works.
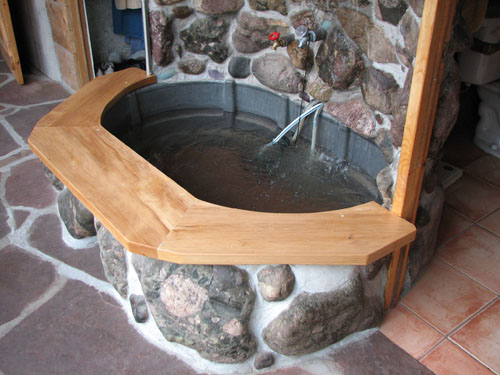
There will be more rockwork around a solar hot tub in the green house area, which serves as more thermal mass that will be heated by the sun.
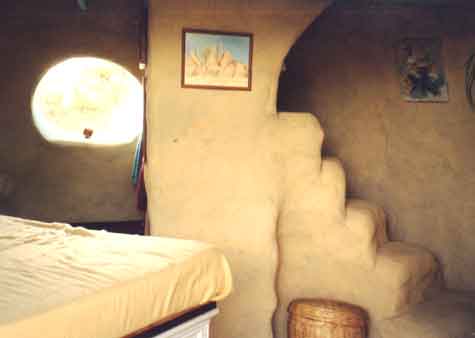
This shows the curved stairway in the bedroom that leads to a small loft. The stairs are made of earthbags filled with sand, and covered with papercrete. The coloration of the interior space was accomplished by brushing a small amount of latex paint mixed with lots of water onto the papercrete walls. This basically stains the wall without interfering with the breathablity through the wall.
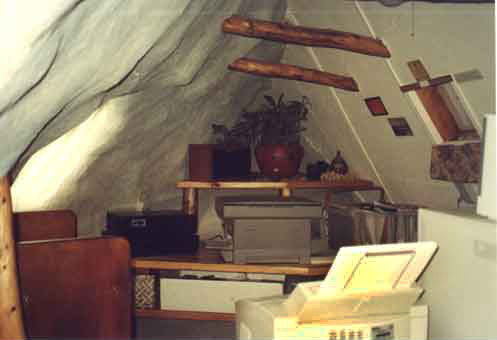
Here is the office space carved out of the attic area in the middle section. The bag wall can be seen on the left, and the wood-framed wall is on the right. Wooden braces that help secure the shape can be seen near the top of the photo. ASPECTS OF SUSTAINABLE ARCHITECTURE GENERAL DESIGN There is no concrete foundation; the house rests on a pad of scoria laid directly over the natural sand. Successive courses of polypropylene bags filled with sand (on the bottom few courses), and scoria (on the rest of the courses) are piled in an overlapping (brick-like) fashion to form the domes. Between each course are two strands of 4-point barbed wire. Each section of the house has a loft framed with conventional lumber. Some of the domes have poles arranged on the second story to help support the shape of the dome. The earthbags are covered initially, both inside and out, with papercrete (recycled paper, with a small amount of Portland cement). The final layer is either a lime plaster (lime, silica sand and white Portland cement), or papercrete with sand added. In some cases the final coat of papercrete has been stained with latex paint thinned way down with water. All of the walls and roof areas remain breathable (except the central metal roof under the solar equipment). Floors are poured adobe, flagstone, tile, papercrete, wood. (This house was built in a county that has not adopted the Uniform Building Code. The usual plumbing and electrical codes were required, and inspected for.) HEATING COOLING VENTING RECYCLED MATERIALS NEW MATERIALS NUMBER OF BAGS USED SQUARE FOOTAGE Approximately 3 years of owner/builder time at about 30 hours a week. No hired labor. Occasional friends' help. R-VALUE OF THE WALLS ELECTRICITY HOT WATER GREENHOUSE CONSTRUCTION COSTS:
Here is an interview with Kelly Hart about building this home: 1. What was the construction method you used? 2. Why did you pick this (earth block, earth bag, Hemp-Crete block) construction method over a more traditional approach (2x4’s / CMU etc.)? More ecological and economical.
3. Where did you get the idea? How did you decide to build your home using a different construction method than traditional methods? I had made a documentary video program about various alternative methods and decided to try using earthbags after I bought some property to build a home. Earthbag building seemed to be one of the more sustainable approaches because it uses mostly local earthen materials.
4. What was your role in constructing the home? Who all else was involved?
I occasionally had assistance from my wife or friends, but primarily it was me alone do the construction.
5. How would you describe the process? Please describe the process for constructing the home using natural resources as a part of the construction method.
Earthbag building involves filling polypropylene bags with various materials; I mainly filled mine with scoria, a lightweight volcanic stone that provides good insulation. These bags are laid in courses like bricks with two strands of barbed wire running between each course.
6. What are some of the advantages and disadvantages you’ve noticed concerning these structures regarding the construction method used and the final structure? (Cost, comfortability, insulation, simplicity, aesthetics, rigidity etc.)
The cost is quite reasonable, compared to most other methods. The house turned out to be very comfortable, utilizing mostly passive solar heat. The scoria provided excellent insulation, and there was thermal mass in the floors. The process of building is quite simple, requiring few special skills. Aesthetically the designs can vary considerably; my home was a series of domes. There is very little that will rot or decompose over time in this building, so I expect it to last a very long time.
7. How would you describe your living conditions inside inside the home?
The house was very comfortable to live in and was aesthetically pleasing.
8. How are your lives and daily routines affected by living in a home constructed using natural resources?
The basic design of the home required some daily attention to opening and closing blinds or vents in order to keep the house comfortable, but otherwise there was little difference with most other houses.
9. How did it make you feel after it the home was finished and you started living in it? (brought family or community together, sense of pride, etc?)
There is nothing like designing, building and residing in a home created by yourself to have a sense of satisfaction and accomplishment!
10. Is your structure the only one of its kind in the area? If so, how does it make you feel in terms of your community?
It was at the time, but now there are a few others. I became both a person of respect and some ridicule I would say.
11. What was the greatest threat to your living conditions prior to building this structure? (geographical, economic, political?)
Actually I was living in a lovely bus conversion motorhome that I had created that served our needs very nicely, so the house was not necessary.
12. How did you learn to build a structure using natural resources?
I had built things all of my life, worked as a carpenter/remodeler, and was ecologically minded anyway.
13. If you were trained to build a structure like you home, who taught you and what is their background and how difficult was it to adapt and implement these strategies the construction method?
I learned much from my father, who also had built structures, so I grew up doing this sort of thing. Also, I tend to think out of the box, so taking on alternative projects was easy.
14. Do you know of anyone else that has implemented construction strategies using a similar method or a construction method that uses natural resources? (or one of the following: Compressed earth block, Earth Bag, Hemp - Crete Blocks). If so, how do they perceive their home in terms of the society and economy?
I am familiar with many people who have built homes using alternative, natural methods and most of them are proud to be advancing the cause of creating a more sustainable world.
|
