| BOND BEAMS: Concrete, Tubular Steel, Corrugated Metal, or Tubular Bag |
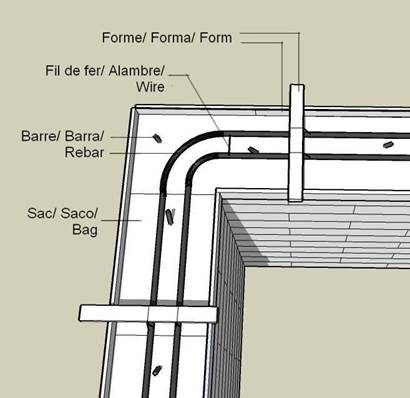
Reinfornced concrete bond beam Tubular metal or wood bond beam Stabilized earth bond beam (for round buildings only) INTRODUCTION These construction techniques are chosen because they are low-tech and low-cost. Combined with good quality control, they can create buildings strong enough to survive hurricanes and resist earthquake damage. Good quality construction includes: • plumb and level walls • adequate tamping • strong bags • correct soils • appropriate building dimensions • maintenance of exterior plaster layers and roofs These are all necessary to create hazard-resistant buildings. More information on these topics is available at www.earthbagstructures.com. Engineers or expert earthbag builders may be able to make specific recommendations better suited to your site and building. This information is intended for small single story houses built of 38 cm (15") wide walls of 25 kg (50#) bags filled with an earth mix containing some clay. Earthbag is very strong in compression (carrying loads) but can benefit with additional reinforcing bars in key locations, especially the top, to resist lateral movement. A continuous ring or bond beam is critical to keep earthbag walls together during an earthquake. • Attach the bond beam well to the cord or wire or strapping or mesh that is used to tie the walls together vertically. • If the bond beam is located at the height just above the door and window openings, integrate the window and door lintels into the bond beams. • Use rebar at least #4 (1/2") diameter. REINFORCED CONCRETE BOND BEAM:Materials: Cement and sand, wood or metal for forms, rebar, wire, (optional bolts or brackets).
Forme/ Form: Use metal or wood to form the bond beam 15 cm (6") high and as wide as the wall. Use temporary braces to support the rebar. Fil de fer/ Wire: Fasten rebar in place with wire nailed to bags. Overlap rebar 30 cm (12") minimum at ends and tie well with wire at ends Barre/ Rebar: 2 rows continuous rebar and hammer 60 cm (24") long rebar 45 cm (18") down into bags every 60 cm (24") minimum Sac/ Bag: Set earthbags level and tamp well before building the form for the bond beam above A standard bond beam used on most masonry walls. Use the right amount of Portland cement in the mix, and don't add extra water. Anchor brackets or bolts in concrete, or leave vertical rebar exposed above concrete to attach roof framing. TUBULAR METAL OR WOOD BOND BEAM Materials: threaded rod, hollow rectangular section tube or wood, rebar, brackets.
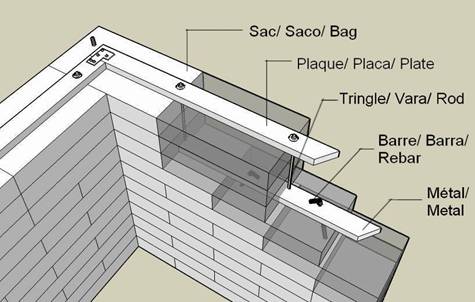
Sac/ Bag: Set earthbags level and tamp well Plaque/ Plate: Drill holes in 5x10 cm (2x4 inch) wood top plate (or similar hollow rectantular section steel tubing) every 60 cm (24") to receive threaded rods. Tringle/ Rod: Use threaded rod 50 cm (19") long to sandwich three courses of earthbags between the top plate and the lower metal tube. Align bags to fit between rods. Barre/ Rebar: Hammer 60 cm (24") lengths of rebar into bags below through holes in metal tube. Drive in at alternating angles every 60 cm (24") and bend the tops over. Métal/ Metal: Drill holes 30 cm (12") on center in a 4x10 cm (1 1/2"x 4") piece of hollow rectangular section tube. Lay it flat on the exterior walls 3 courses below the top. Pass galvanized threaded rod through every other hole. Use metal brackets or plates to screw or bolt the metal tubes and the wood top plates together well at building corners. For a detailed description of the steps involved in preparing such a bond beam see this article. CORRUGATED METAL BOND BEAM
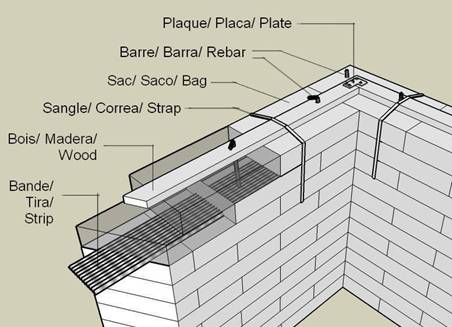
Materials: Corrugated metal, nails, rebar, wood, twine or strapping. Plaque/ Plate: Use heavy metal bracket or plate to screw wood top plates together firmly. Barre/ Rebar: Hammer 60 cm (24") lengths of rebar through holes in wood plate into bags below, punching through corrugated metal strip. Drive in at alternating angles and bend the top over to tie the bond beam to the walls. Sac/ Bag: Set earthbags level and tamp well Sangle/ Strap: Use strong cord or strapping or wire with mesh every 60 cm (24") to sandwich one course of bags beneath the metal strip and two above to the wood top plate. Bois/ Wood: Drill holes in 5x10 cm (2x4 inch) wood top plate every 60 cm (24"). Bande/ Strip: Cut pieces of corrugated metal roofing into strips 20- 30 cm (8- 12") wide. Overlap strips at least 30 cm (12") and nail to the bag below at overlap points. Lay two courses of earth-filled bags above the corrugated metal strips. STABILIZED EARTH BOND BEAM (FOR ROUND BUILDINGS ONLY) Materials: Tubular bag, cement, rebar, metal for fasteners.
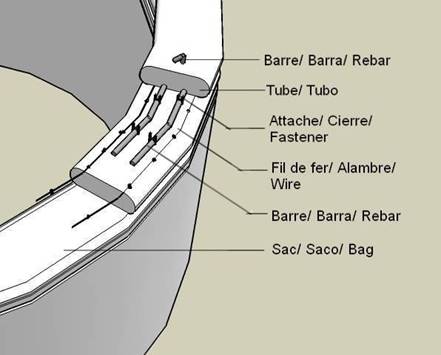
Barre/ Rebar: Before the soil mixture hardens drive 60 cm (24") lengths of #4 (½") rebar at alternating angles into the bags beneath. Bend rebar end over and hammer rebar in 60 cm (24") on center minimum. Tube/ Tube: Lay earthbag walls level and tamp well. Lay and fill one 46 cm (18") wide tubular bag 75% full with a mixture of cement-stabilized earth. Place rebar and wire above before bag hardens. Fill a second tubular bag placed on top 75% full with cement stabilized earth. Attache/ Fastener: Use H-shaped metal fasteners to pin the rebar to the tube beneath, and anchor the bag above well. Fil de fer/ Barbed Wire: Lay 2 strands of strong barbed wire continuous on top of lower bag. Barre/ Rebar: Lay 2 lengths of #4 (½") rebar continuous on top of lower tube. Overlap rebar at least 30 cm (12") and wire together securely. Sac/ Bag: Taper earth-filled bags to fit radius and lay level and plumb. Tamp well before adding bond beam. Test soil to determine minimum amounts of lime and cement required to stabilize. Provide roof fastening before stabilized soil sets hard. Drive rebar through wood nailer plates; drive long, bent bolts for roof attachment into upper bag; or leave top of rebar exposed to attach brackets for fastening roof. |
