First Aid Earthquake House Page created 19 Nov 2005, amended 23 Jan 2006 |
||||||
Emergency Shelter intended for people affected by EarthquakeDuring the earthquake in Pakistan, 3.5 million people became homeless and they wsere exposed to life-threatening freezing weather. The children of Primary Schools in the Netherlands made funds available to provide these people with medication and medical supplies to survive during this winter. Especially small children are weakened by lack of food, and need appropriate healthcare and safe shelter. Therefore, as part of our initiative and within the framework of the healthcare provision following the WHO-guidelines, agreed upon by the members of the UN, we would like to introduce you to the Earthquake Shelter which is built out of very cheap and simple, transportable materials. The house is designed simply, in such a way that people can construct this facility themselves. Hence, we offer a materials kit and clear instructions of how to build this shelter. We would like to ask everybody to help the people in Pakistan now! This is possible by sponsoring the materials they need to build these houses. On behalf of the children in the Netherlands that support and sponsor this initiative, we will ask for Governmental support, both from Pakistan, The Netherlands and the International Community. Sincerely yours, H.C.M. van der Wardt, Ing W.E. Schrader, GP. Materials kit (for 72 people)All materials that are needed to construct the house need to be transported by rolls or in a folded manner, in order to take the least amount of space and weight for transportation. Alternative and additional materials can be collected from the site.
The first Aid Earthquake house
After the walls are finished, the rope or cable can be spanned between the walls. In connecting the ends, loop them around the two highest bags and use the weight of the bags to support the span of the roof. Also we put the canvas around the last and the next to last bags. After the shell is completed, we can start to insulate the house. This is done from the inside, by fastening with tape whatever kind of insulation material is available against the ceiling or placed between the ropes. The insulation is taped shut from the outside air with insulating aluminium foil. Below are more comprehensive instructions about each construction phase.
The walls
It is important that they break down these materials as fine as possible with a hammer. The finer the material inside the bag, the more stable the construction. After the bags are filled, they can be closed with ropes. The next step is to stack these bags upon each other like stones to create the walls of the Earthquake house. It is very important is to stack the bags in an cross-bandage pattern, so stability of the wall is guaranteed. With cross-bandage, the second layer is always starting in the middle of the bag which is below. The corners must be constructed in cross-bandage pattern as well. The cross-bandage pattern is created by overlapping the first row or course with the row above and below it. Extra strength can be reached by looping steel cable around the corners of the bags. An alternative would be to connect the bags with mortar at the corners. This would give more stability to the overalll construction.
The sizeIn the long direction, the walls can be placed 4.4m from each other. This offers a place for two (2) rows of beds in the long direction and enough room to walk between. Within this 4.4 m inner space, the inner wall is always higher then the outside wall. Here, a roof slope of approximately 4- 8 %, which is equal to 60 cm / 4 sand bags, with a span of 4.4 m. In the direction of the width (or short side), the wall placement depends on the size of the canvas. This is best accomplished by connecting pieces of canvas on a sand bag wall. Above this connection, you can place a sand bag or tape a piece of canvas. This makes the connection waterproof. For best insulation and earthquake stability, we recommend that the bags on the outside are oriented so that the longest side of each bag faces the inside, as much as possible. This gives the wall the highest insulation level and highest stability against new aftershocks. For the inner walls you can use the shorter side of the bag for the wall thickness. These inner walls give the outside walls more stability. Floor plan possibilitiesWith these walls, various configuration schemes for floor plans are possible. We recommend arranging the living units together, as much as possible. This will save on materials and create more stability for the construction. Depending on the materials which are available on the site, the living units can be built up with additional construction to shorten the distance of the spans. If there is no construction material available in the environment the units are built up by four walls of sand bags. If there are construction materials available in the environment, like wooden and iron beams, then it is possible to enlarge the floor space, creating greater spans, thus saving more materials for other houses. These beams can replace one sand bag wall. Construction elements can be out of wooden or iron beams. These beams can be put in a hole, which is dug into the ground. The hole can be filled with available mortar, so the construction doesn't collapse quickly. It is important that the rope spans from the additional construction to the side walls of the house. This creates an extra span, which can carry the canvas. Through the extra construction a larger span is possible between the sand bag walls. Accordingly, rope can be spanned in the direction that the canvas will span the construction, on the short side. This will offer support to carry snow and rain. Thus, the canvas will have the ability to carry more weight and will sag less inside, by the weight of snow and rain. Improve the insulation of the walls
The insulation of the walls can be improved by insulating on the inside of the house with aluminium foil, insulation foil or radiant foil. These materials are taped to the walls. It is important that the tape seals the outside air passing to the inside. The foil reflects heat and warmth that is produce inside and keeps it inside. Other holes can be filled with paper. Openings in the wallsIt is very important to not put heavy materials above the openings in the walls, these can collapse during aftershocks. For more stability at the openings in the walls, side construction can be used. In between the last two (2) sand bags of the opening of the wall, place a wooden beam. Around this beam a blanket can hung to close the opening. If you do this double on the outer and inner side of the opening, extra insulation can be reached. Ventilation possibilities in the wallsTo circulate and ventilate the air in or between the spaces, the leftover cardboard tubes from the aluminium foil rolls, can be embedded in the walls, thus creating small ventilation openings between walls. The roof
The roof is constructed out of plastic tarps or tent materials. The tarps can be stretched over the sand bags in the shortest direction of the construction 4.4m. The roof slope of approximately 4 - 8% is important so the snow can stay on the roof and create extra insulation for the shelter. To hold the roof the canvas is placed between the second and last bag on both sides. For holding the weight of the snow, extra ropes can be spanned between the bags. These ropes offer two advantages: the ropes can enlarge the size of the construction length and it can be used to carry the heavier insulation materials, like an old bed mattress or other materials available on the site. These materials can be put in between the ropes without putting more weight on the canvas. Insulation possibilitiesTo insulate the roof, many options are possible. It is important that these materials are light in weight. This is important that when there are after shocks so people are not hurt by anything that may fall down. Therefore we suggest some insulation possibilities. It is important that if there are more layers of insulation, the tape pattern should be cross-bandage to allow as little heat as possible to escape. Airbed insulation
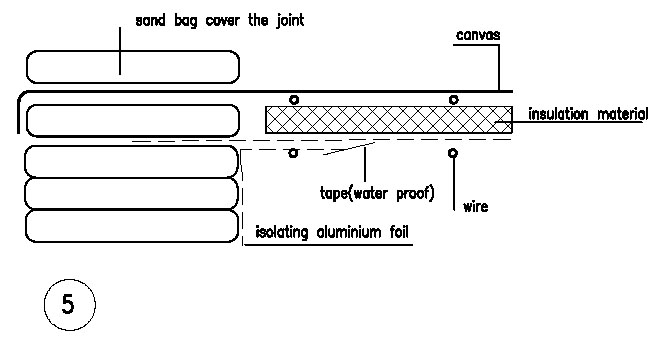
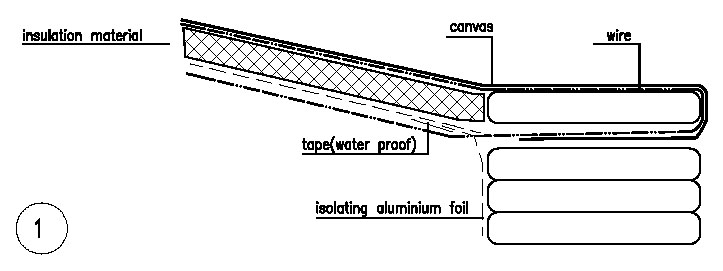
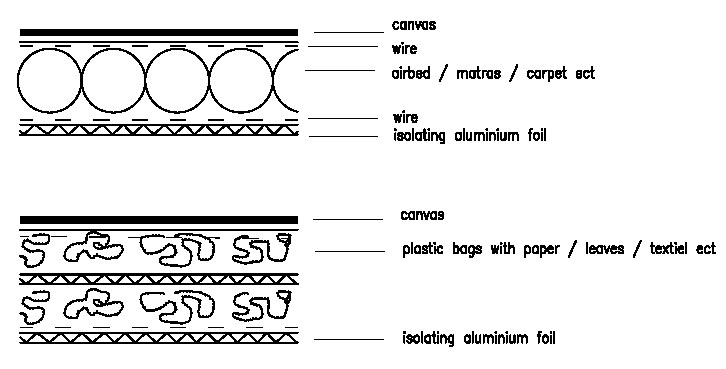
Insulation can be created with airbeds. These airbeds weigh less, can be easily transported and can be taped to the ceiling or put in between the ropes. Accordingly, to which degree the roof needs to be insulated, more layers of airbeds can be stacked on each other. Every layer can be covered underneath with aluminium materials to reflect the warmth back to the inside. The corners between roof and wall need to be taped air tight, so that there are no openings left, (see insulation detail 1.) Paper or wool insulationThe best way to insulate is the low-tech solution using the cheapest materials. Here we use plastic bags, which can be filled with insulating material, like bundles of paper and textile materials. These bags can be taped to the ceiling. Different layers of these bags are necessary to create the right insulation level, (4) levels. If each different layer is covered with a layer of aluminium foil, a high insulation degree can be reached. This is the cheapest solution. Another alternative material for plastic bags can be plastic foam wrap, that is used as packing material. This plastic foam wrap has a better insulation value and be delivered on rolls, (see isolation detail 2.) Old bed or furniture material isolationIf there are extra ropes available, old beds or other high insulating materials which are heavier but soft, can put between the ropes. These materials might be found at the site. The packet can be closed with insulating aluminium foil or be taped, (see insulation detail 1.) Details.Connection wall / roofIt is important that there are no leaks of warmth between the connection of the wall and the roof. Therefore we recommend that you put between the second last bag some insulating aluminium foil which can be taped to the ceiling. Note wires above and below the insulation. Connection canvas / canvas
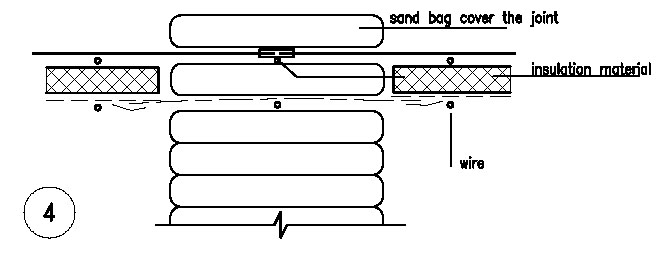
Fastening the pieces of canvas to each other in the long direction can be done in different manners. We can nit the canvas with small rope or lines if there are holes on the sides of the canvas. On top of this connection we can put a sand bag or tape another peace of canvas, (see detail 6.) Bed and furnitureBeds can also be created with the sand bags. These can be filled with dry leaves, which can create an extra warm place to sleep on. Seat bags can be created in the same way.
|
||||||
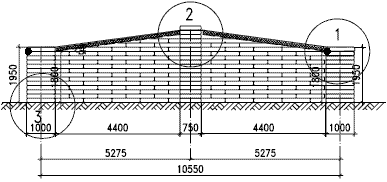 The house is made out of very simple materials: sand bags, rope lines, tape and available insulation materials. The construction process begins with filling the sand bags with fine and heavy materials, where this is possible. It is important to make sure that the inner wall is higher then the outside wall.
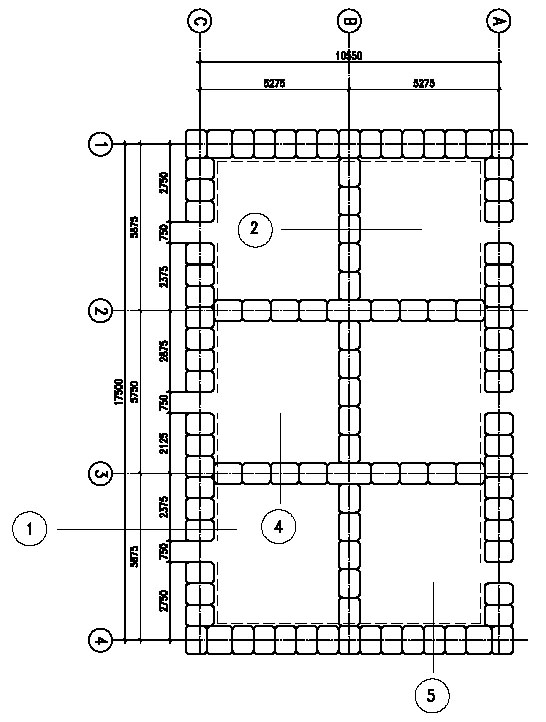 The walls are built out of sand bags, max. 75 x 100cm, which are strong enough to carry approximately 70 kg. This weight is acceptable for two persons to carry. The sand bags are transported in rolls. The sand bags can be taken from the roles and filled with earth and sand. Materials from the collapsed houses in the area may also be used.