| The Gypsy Farm Adventure by Pat Newberry www.gypsyfarm.com |
Fall/Winter 1997-1998 It's kind of strange to draw a few lines on a piece of paper and then attempt to bring it into being.
Here I am using a compass made out of electrical conduit, a tree trunk and a wheel. The conduit is a bit weak so it must be used carefully. Using this devise as a compass I am able to keep the structure round. The arches are build as lancet arches. This means the distance from the center increases as you go up the dome. You should calculate those distances on paper before you build.
For the foundation / stabilized earth portion of the domes, I first use 24 inch wide bags for the first two courses. The third course will be from our roll-o-bags or the superadobe bags. The large dome bags is over 78 feet long at the base (or 22ft 8 in diameter). My superadobe bags are 18 inches wide (flat). The dome will be about 18 or so feet high from the floor to the ceiling.
This shows the large dome and the foyer dome foundations.
Some thoughts about bags:
In this photo you are standing in the large dome (22 ft diameter). A large vault stands in the center of the photo and is the main entrance to this room. Part of the inside wall of the vault is plastered with an earth plaster. On the outside you can see the stabilized earth plaster. The pole in the center serves as a compass to keep the dome circular. Overview of current building:
The problems with the font door vault started when the first version of it collapsed due to my use of some two point 1/4 inch barbed wire. You need to use four point 1/2 inch barbed wire. After five days of rain the area with this wire was able to push out causing the vault to collapse. This could have been avoided in several ways. The moral of the story is if you don't have time to do it right the first time, you have to make time to fix it after it breaks. Do it right the first time and avoid the whole mess!
We now plan to build the walls surrounding the large dome with a combination of strawbale and Cal-Earth superadobe earth filled bags. The bags will serve as the post in a post and beam strawbale building. I feel this will help speed up the process a bit. Building with earth is a labor intensive activity which I love but I feel this will help the building stay cooler in the summer. Much focus is givin to keeping a house warm in winter, but here in middle Georgia, the summers are, to me, the biggest challange.
I like this photo as it gives a good over view of the current structure. The form is still in place for the vault/doorway which will lead to the dinning room and kitchen.
This view is from the large dome with the form in place.
The photo is a closer shot of the Bath room and bedroom area looking into the large dome.
I am currently thinking of putting an octagon window in the back of this seat.
Fall, 1998 I've discovered what I feel like right now. You see I use to run marathons in my youth. It was my way of relaxing. Well the point that I'm at now reminds me of the 10 to 15 mile mark in a marathon (26 miles). You are far enough into the race to be tired, but far enough away that the finish line can't quite pull you in. Yea, that's where I'm at.
This photo shows where the front door will be located. Wire mesh will be draped over the bamboo frame.
This photo was taken from the ladder near the top of the dome. My wife, Carroll, is wearing the green out fit. Our Friend Filicia is with her. It should be noted that just prior to this photo being taken my wife yelled out "don't take my picture cause I'm not dressed for it." You can see how well I listen.
Here we will place a small seat to remove one's shoes prior to entering the house. This seat is located in the foyer.
Notice the rebar embedded in the cement filled bags.
This view is the south side of the building. I'm still debating how much glass to put here.
This photo shows the vigas (logs cut and peeled on the land) fanning out from the center dome.
Winter, 1998
The room on the other side of the doorway is the foyer.
This shot is looking at the foyer and kitchen area. One thing of interest is that other than the dome itself, there are no interior walls. Yet if one stands in the kitchen you can not see in the sleeping area or the office.
I really like this domed space. I've taken to resting down here as it gets dark after a hard day at work. As you can see I've been experimenting with different types of plasters. We have a variety of clays around here which makes it fun.
This photo was taken on the wall of the big dome. Here you can see how the octagon wall ties into the dome itself.
Plastering is a hot item around here these days. We took a lot of water the other week and I'm feeling the need to protect this wall some from the rains that will pour off the dome before I put up the octagon roof.
I took some metal straps and bolted them down to the bond beam at the top. It will hold it, at least for the moment.
It's a bit more work that I thought placing and wiring the chicken wire. While I prefer not to use that much cement, this seems to be working fine. Since I'm just putting a shell over it for the moment. I will at some point add another dome over this one to either use the air space in between or to include some insulation. I'll cross that bridge when we get there. In order to protect the out side wall of the dome I'm going to put a temporary "skirt" around the large dome to keep the water from rushing off the large dome and on the earth walls that are holding it up. They have taken a lot of water before, but I'm just trying to be carefull at this stage in the game. Spring 1999 Well I can smell spring in the air and the days are getting longer, which means I can work more hours on the house! When you look at the photos, you will see I have started using some of the natural lumber located on the land. I harvest and peel my own logs. You will also notice the reciprical roof on the dome.
Here you can see how I have utlized both natural lumber and the superadobe bags. If your asking what the advantage is in utlizing both? It is going faster! Now don't get me wrong speed is not number one, but it really has helped and I already have more than enough mass. It looks really nice.
I have been using metal strapping at my log joints as my carpentry isn't as good as it could be. If it doesn't look good I can cover it with something, but the metal strapping really tighened down the framing. The infill for these walls will be some combination of clay-coated straw, straw bale, and cob. Exact details aren't known yet...we'll just have to see how I feel when I get there.
Summer 1999
Here you can see our hybrid strawbale / superadobe (earthbag) wall. With the use of and earth plaster I covered the strawbales and you can also see a test patch of lime over the earth.
Last but not least, here is where the bath room will be located. The shower will be located in the corner. A kind of cave like look.
Fall 1999 We moved down the hill, as we refer to the house we are building about half a mile from the one room trailer we four (my wife and two teen age children) have lived in during the last couple of years, because I had to move closer to the house. In reality my wife and I simply did not want to spend another winter in the trailer, good, bad or indifferent. Since I work from home I needed to have an office where I could place my computer equipment. The house was still under construction and an earthen home under construction means a lot of dirt, which is not good for computer equipment. Luckily we found an old airstream trailer from the local salvage yard. I pulled it up and my new office was born.
The plan is to cob the outer walls and that wasn't going to happen in a weekend. The decision was made to wrap the house in plastic. The idea is that as we cob up the wall, we just peal up the plastic. I placed the plastic such that I'd cob from the inside so that even if it was a bit cold, I could build a fire to warm up as I was cobbing away. I wanted to put up some quick space for the kids. I found a reconditioned 9 x 21-foot tent with two bedrooms and put it up on a platform. I found a couple of oil filled electric heaters since they don't burn oxygen and thus I had bedrooms for the kids.
When I started, natural building meant building with the things that nature provides and I've now come to realize that man too is part of nature. For me at least, natural building means using the materials at hand. Old carpet scrapes and discarded wooden slates join clay and straw.
Unfortunately we seem to be moving away from that idea. The building codes of today are becoming less understanding of experimental ideas. The primary goal of building seems to be increasing the monetary value of the house rather than providing shelter. The option to build as I have built will become less of an option in more and more locations. Since I have started building this house the county in which I live has adopted new building codes. I do not know that I could build this house here today had I not already obtained my building permit. Spring 2000
Since this wall is one of the first walls completed, it has been the recipient of several experimental plasters. Sort of reminds me of the fellow that says he plans on living forever, and says so far so good.
Ok, I'm a bit of a ham. Hey Mom!
Fall 2000 I guess you could say, this experience has changed me. I guess you could say the house has worked on me as much as I have worked on it. Well the plan now is to finish the walls, then the floors prior to winter's arrival. We spent last winter with only tar paper and plastic for walls. We intend on changing that this year. Good thing fools like me live down south where winters are short and mild. The main factor which should contribute to the success of completing the walls before winter is the fact that I got laid off from my job. The timing worked out pretty good and I'm going to take the next couple of months and try to knock out the walls and floors.
This walls shows a portion of the kitchen wall. Physically it is the north-east outer portion of the dome. As you can see, the lime which is also the final plaster, is working it's way around. The portion of the wall on the left is a plain earthen plaster which is then covered with the lime plaster to keep dust and such down. This lime plaster uses a red clay in it's mix and when it's mixed, it turns into a sort of peach colored plaster. Quite nice I must say.
You might be interested to know that I haven't always been interested in organic shaped houses. I remember the the day we pulled into Nader's place in Hysperia California. I looked over at the first couple of domes and thought, Oh my God, what have I got myself into now. It was a tough time as we as lost most everything in a fire just prior to this and this trip to California was basically an "on the spur of the moment" decision, perhaps mixed with a bit of desperation. I realize now that what Nader gave me was not so much of the knowledge of how to build but the confidence to build. For you see I had spent a lot of time reading and studying prior to going to CalEarth and in actuality I had that knowledge already, what I lacked was the self-confidence to proceed.
Winter 2000
The walls and floors are not finished. There is basically 1 ½ walls left to build, and most of the walls still require a finish plaster but even so I'm on the downhill side of the task. The floors remain unfinished, as I want the walls completed and plastered before laying the floor.
After being laid off my job and with lots of spiritual type of questions bouncing around in my head, I finally relaxed a bit. Well guess what? I now work for Habitat as a programmer in their Information Systems Department. After 20 years of working in the For Profit world of Corporations, I have found the world of Non-Profits. Thus between Gypsyfarm, Koinonia and Habitat I've found my place on earth; A place that blends my personal, spiritual and professional life together.
Here you can see some of my wonder wife's handy work. She and a few of the senior citizens here in Taylor county decorated the windows for me. It's a struggle to not mess them up when cobbing. The cob washes off easy enough but I don't want to wash off the acrylic decorations with the cob! Well It's been a cold cold winter and I will tell you this: it's awful hard to build with cob when it drops below freezing and don't let anyone tell you otherwise! I've got what I think will be my last batch of clay delivered a couple of weeks ago and now each weekend when the weather is nice and I'm not volunteering for something, I work on the house. In summary 2002 Some years ago I made the choice to build a house. While it was a fairly major decision in that it affected my entire family as it involved moving from the city, living on less money and putting the weight of building a home on my shoulders, I did not realize the scope of that task. This realization might have stopped me had it occured early on but as they say ignorance is blitz or at least a factor in much what is classified as innovation and progress. The initial dreams I had will never be and through fate, luck or lack there of, I continue forward. I've stopped, surveyed the landscape, made plans, chuckled at the futility of those plans and continued to march. In the last year I've lost a wife, a friend and a brother, yet I continue. My son and daughter each have their own struggles, just as each and everyone of us and still I continue, I pull up my beat up old wheel barrel, fill it full of earth and continue to build in the midst of death, in the midst of what might be on the surface be called an act of futility yet I still find light and love, laughter and joy. What I've found is that when most people says "my house" or "my home" it generally means more than a physical location, for it is a nest, a store of memories, a subtle or not so subtle symbol of who we are. When I am gone people will see this house, a place deep in the woods, deep in a country that attempts to standardize houses, people and life into nice neat easy term payments just sign on the dotted line packages, and these people will say who in the hell build "this" place. The walls are not straight, the floors have low and high points, and just as no amount of standardization can eliminated the messiness of life, I hope they will see a home made of earth and realize that homes can be build from the earth, from the scrapes of other buildings, from dumpsters and from the get rid of section of building supply stores. Perhaps they will think that things can be done differently, not necessarily my way, just another way than is required by well meaning zoning laws, by one size fits all building techniques, maybe they will rediscover the freedom that is our legacy, but which we are loosing to standardized fear and the war against... fill in the blank... path we seem to be treading. Perhaps there is a correlation between the freedom we have to build and the freedom we have in our lives, as our homes are a reflection of us and our society. I don't ask this so much for myself, but for those that come after me, those that still have that decision to make. The opportunities need to be more than facing a large mortgage with a mortgage whose interest is more than the cost of the house itself for a housing solution with questionable consequences for the planet itself. Let us open up to alternative options for the act of a person building their own house as this will assist in building stronger families and stronger communities. I will continue this journey, this struggle started so many years ago, this journey we once called a Newberry adventure, yet today I see this small adventure as part of a greater journey with it's connections to the others on this plant as we travel together. |


 This shows the second course of the large dome. Barbed wire is placed between courses to help add a bit of reinforcement and to help keep the next bag from slipping when filling it. The next bag laid will be a single bag for the entire course. These bags are from our local feed store Peed's feed.


 I have worked with three types of bags. The first one being the Cal-Earth bags which are a single bag on a large roll. I think these bags are great but the cost for this is something like $850 plus shipping. In the interest of reducing costs and learning more about this style of building I have tried some burlap bags and the single poly bags. The bulap bags are very nice and plaster very easy, but the cost is a bit more than the polly bags and the source I had wasn't very reliable. These bags cost more than the Cal-Earth single roll.
  Now the poly bags are the same material as the Cal-earth roll except that they are individual bags vs one long roll. McDowell Industries, Inc out of Memphis Tenn sells misprints. The cost seems to vary based on availabilty and quantity purchased. The cost can be about 10 to 20 cents a bag if purchase by the thousands. Sounds like a lot but if you're building a house they go fast. Plus I use them to store about everything.
 This photo has you standing in the large vault leading to the foyer. The opening on the other side is where the front door will go. I do have some bad news here. The wonderful curve you see on the arch leading outside, well it lost part of it's shape. The vault leading to the laundry room held it's shape. Here again we get the point, Keep those forms in until it really really time. To be honest if I were to redo the foyer it would be 10 times nicer. I've learned a lot in the last eight months. It is a good thing that I started with the foyer because I have avoided those mistakes on the large dome.
  This photo was taken inside the large vault. It is an earth plaster with some straw and lime added. I am considering adding a small amount of cement. By small I mean like one can (coffee can) per wheel barrel full.
  This photo shows a plastered outer wall. It took three coats to get it like this. No attempt was made to make it smooth, My wife has, however requested some smooth walls.
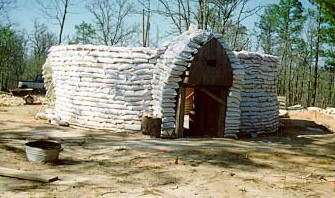
 This view is from the doorway leading to the large dome with the form removed. This doorway will lead to the bath and sleeping areas. To give you an idea of size, the large dome is 22 feet in diameter. The vault on the right has the first coat of plaster applied. The left portion of the structure is the main entrance with a window seat.


 If you notice that red stuff in the center of the photo, well that's some clay coated straw. I was planning on using that for insulation, but with winter getting close and the wet season as well, I need dry space. We get up to 52 inches of rain a year here, so that is a matter of consideration.


 Under the wooden arch you see in this photo, a large plate glass window will be placed. I use pine, and scub oak for most of my lumber.

 The subject of much discussion on several list serves, comes to life at the Newberry homestead. Yup, the infamous reciprical roof. I actual stood on this without a single nail in it. I don't recommend you do such a silly thing. Anyway, I got some material from a textile mill near here. I first nailed down some chicken wire, then the fabric. I then layed down a layer of clay coated straw. Not too much however, as I wanted to keep it somewhat light. Then I placed a couple of layers of tar paper, then I will put my cement/carpet roof on top of this. The very center will be a sky light made with Lexan.
 This is where the front door will be located. The kitchen will be on the left, and going straight will take you into the dome.


 This is the outer wall of the bathroom. You can see superadobe on either side of the cob wall. The windows were suspended with wood strips and the cob was built up around them so that at this point they are embedded in the cob.