| Hootenanny in Baja: An Earthbag Adventure |
On a stretch of Baja coast, half way between Los Cabos and La Paz, a dream is coming together. All Jeff's life, he's wanted to build an 'EcoShip' in which to travel through modern life. We found the 'vessel' in a technique called Earthbag construction. Our dream is to gather our family, friends, and local Mexicans. Together with the earth, sun, and sea, we will craft an abode of beauty, simplicity and comfort. Working together, we'll expand our horizons - how to build a safe and beautiful home for a small cost.
We have built the infrastructure you need (water, septic system, shower, toilet, outdoor kitchen, sink, satellite internet, and free phone service to USA), and have prepared a beautiful camp environment. The plan is to build 2 domes and a semi dome bathroom. We offered 3 cooked meals a day to workers, a fun and family-friendly environment to work and hang out, and 3 nights stay for each day of labor worked. But the real gift is what we'll find when working with the earth, being together, and learning this simple and fun technique. The Hootenanny Begins: 11/24/08
We are nearing the completion of our first dome - the bathroom (bano). This sits next to its cousin, the shower, and are both in need as we have 6 people camping on site and they've been holding a really long time :-) The First structures - bathroom and shower - are up. Foundation nearly ready. 11/29/08
Everyone Must get Earthed: 12/1/08 I said it could be done, and it was! 3 generations were bagging today and yesterday. Combining our 'gringo' team with the local 'Mexican' team, we're making excellent progress!
This team is rocking and rolling, in one week completing a full bathroom and shower (with a sink), digging out the foundation, and starting to lay foundational bags. We used 14" bags for the bathrooms (not domes, but 9 feet structures) and are using 18" bags for the 15' Sunrise dome and 15" bags for the two 12' domes (Guest and Kitchen Domes). We made a mistake today and FORGOT to place the foundation lining below the first row of bags (we remembered it for the bathroom domes and had the material - simply in our 'earth luster' forgot to place it under the 18" bags. Oh well, we'll 'scooch' 'em under tomorrow. The Foundation Takes Shape: 12/3/08 We are having an amazingly productive time all working together. We laid two rings into the earth, and then decided to build a form and tie together a fortified earth buttress, instead of using bags as below ground buttressing. Ricardo thought it both more efficient and stronger. Who knows? It used more earth than bags would have, but was fast to do. It's taking place and looking strong.
The foundation is now firm, with either walls of earth or 2 rows of bags around our entire dome The windscoop is in, all door frames are standing, and we are ready for serious bagging. The teams are working amazingly well together. We have built the lower frame for the 'keyhole door' and the frames for 2 interior doors and 'guest room door'. Now we can lay 3 more feet of bags directly onto these frames.
The bathroom & shower are cozy, and joined with a sink! Hopefully they'll be joined by an on-demand hot water coming form La Paz tomorrow.
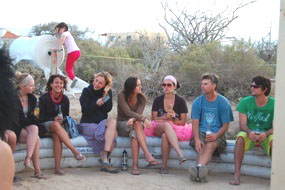
Working together is the greatest way to get 'out of our heads', as we all started to have fun. And work TEMA did! They allowed us to scale to 3 building teams, and within 48 hours we had constructed 3 layers of the dome- completing the last of the buttressing which was a joy! It really was great, with fire dancing at night, big meals, lots of drumming and music, and sharing of stories.
Jenille, Ricardo, and I also concluded that the initial design of 1' wide by 2' long windscoop windows were too narrow, and now they are 1' 6" wide and 2' 6" tall, allowing maximum (we hope) ventilation into the sunrise and guest domes. We are also leaving the bottom 3 feet of the windsccoop empty, with a plan to place an evaporative water tray here - and maybe plants - to make a nice water cooling feature, as well. Now it's a natural 'swamp cooler' we're aspiring to!
The main architectural 'piece de resistance' was laid in today - the keyhole door frame. With a 5-foot span arching over a base of 3 ft square, this is an aggressive use of earth bag technique and looks really cool. Now we just have to figure out how to make a 'real door' work on the space! We are making progress beyond my plans. We're now climbing over all the door, window, and keyhole frames. Today we laid the height compasses on each dome and have started to corbel inward. Meaning, each row is now getting smaller!
Each day brings higher and higher walls. We've now gone over 10 feet above our foundation bags. But most importantly, everyone's spirits are sky high, the kids continue to love earth work, and our partnership with the local team grows stronger. It's hard to think we've really started to see the top of the domes. All 3 domes now are fully into height rows corbeling inward. We have used a '3 foot springline', which means we went 3 feet above our finished floor before we started 'corbelling;' inward. This weekend we're working on arches over the window frames, so we can re-use the window forms, meaning we're creating 'eyebrow' window arches - wait till you see these - very cool features!
I have been dreaming about building my first arch. After working all day on the arch, we realized we'd become spoiled by laying long bag - progress goes quickly. Once you fill and shape a whole lot of smaller bags into a tight arch pattern, required for an arch, work goes sssllloooowwwwlllyy. Ricardo had mentioned that we ought to build the 'eyebrow' over the windows out of concrete using a form. But I was dead set on building natural earthen arches. And we did build one...but then Ricardo's idea seems now like a good one. These are decorative only, and not a structural addition. So, after investing 4 people working 5 hours into a single, beautiful, arch, we've decided to let concrete forms do the other 6.
When discussing 'air flow dynamics', we agreed that a larger opening at top than at bottom will likely create the best 'flow'. And since each bend in a system reduces 'flow', let's not bend from the position between the Sunrise and Bedroom domes, but rather go straight UP the Sunrise dome and position that big gaping mouth to the front. Since few people we can reach have ever actually built a windscoop, we're going purely of theory here. When I came back from picking up Kate and Eli from the airport, the guy had tried to tie the new direction into the main Sunrise dome too quickly, made a few bagging errors, and we had our first experience where we had to tear down 2 bag rows. No big deal, only about 45 minutes to re-do them and make them perfect. But our first major error resulting in wasting rows. Live and learn...it was an opportunity to see just how solid & strong these rows are. First round windows: 12/19/08
So, we came up with a plan. Instead of using the skylights to aid in ventillation, we are going to place 8" pipes between the 3 domes at about 80% of the height up, in places nearly invisible. Then, we will use 4" elbow pipes to vent hot air from the top of each dome to the outside (a trick I learned in a Cal Earth book). This allows each dome breathability during hot times, venting of air between each dome (with, hopefully minimal noise leak), and no need to use skylights to try and open space for ventillation. So now we can use round windows for star gazing as desired, with the elbow joints allowing us to close off entirely by placing a PVC 'cap' onto each vent for the appropriate dome/season/cooling desired. We're going to have a very dynamic system that, when combined with the windscoop, will allow for varied results.
This was a short work week for us, and very little got done from the gringos, though my crew worked 2 full days. We are nearing the last 4 rows on the kitchen dome. We also learned how to plaster from true experts - and after only 4 hours, we are about 25% done plastering the bathroom 'cylinders' (bano - toilet and regalerra - shower).
We attempted our first plaster mix and applied it on our bathroom 'cylinders'. Kate, Eli, and I enjoyed the process (rather easy, though tedious). By lunch, we had finished the entire project, and retired to our rental for a lunch of machaca and egg burritos. The value of a big team! Eli and made the plaster mix, Kate and our crew helped apply it. Ricardo believes we need to first plaster the 'gap' between the bag layers. While Cal-Earth doesn't say so, we went along with this approach for the bathroom cylinders. We'll assess the results as to whether we progress with this or not. Mixing and plastering is a good friend work party, and we all had fun.
We've been pouring the 'eyebrow' windows instead of using bags to form these arches. While it takes cement to make them this way, it's a lot less labor than building small bags to make the same result - and they look really nice this way!
Besides the eyebrows, built with small shots of rebar and wooden forms to hold the arched concrete, we're adding 18" paper forms to make 'star gazing' windows. These windows are made by taking 18" wide, 1 meter long forms and filling them with styrofoam and cement, and then using the form to build walls around. The result will be 18" fixed windows in our ceilings to view the stars. Lovely solution that Ricardo and his team have come up with. The styrofoam filling with small cement makes them portable and strong.
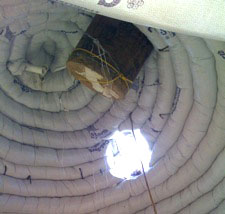
Here is what the walls look like as the bag layers close in to the top of the dome. This is the 'bedroom' dome and is one bag shy - it'll be laid tomorrow. Today we closed the Kitchen dome. Today is a massive accomplishment with the kitchen dome closing in. Having forgotten to place the vent tubes in, we had to go back and cut away the earth and bag prior to its hardening. This worked perfectly - though, without knowledge of proper 'wind flow dynamics' we're just guessing that placing these pipe outflows at the top will actually vent air outward. At least we've tried - it they don't vent, we can always close the tube up. Bedroom Dome is Closed up: 1/7/09 The tops of the domes proved to be a tougher project than projected. Closing them in and making a small cap of cement is no problem, as bags naturally close as one goes up. But inserting the ventilation tubes at angles that will actually extract hot air required a second shot. We started with 90 degree 2" PVC piping, but forgot to insert plastic screens (bye bye bugs!) and decided, after installation, that 45 degree elbow pipes will work much better and facilitate flow easier. Our Domes Are Complete: 1/11/09 We do have some considerations we're having about plaster and the windscoop. Now that it's at top, we have to close it off. We don't wanna shrink it's mouth (keeping the larger at top, smaller at bottom to create air suction), but placing these bags as arches ON TOP of the main dome is a lot of weight (I assume each bag is ~ 800 pounds). While they are flat, they are buttressing - but if we start to raise them as arched bags (to get 'opened mouths'), they become lots of weight. So, our idea is to stop about 3 -4 bag lengths before top and build the mouth out of styrofoam/concrete forms to reduce weight and get a custom 'mouthpieces' on the end of the windscoop.
Exterior Plaster Strategy: 1/15/09 Here in Baja, we have less rain than nearly anywhere else on earth. We're not going to do the final coat of plaster, because I want to percolate designs for a while, and I simply haven't the time while building. So, I'll leave it without a water proof layer and call it a day and finish the interior only this trip. We did amazing work, though. 8 weeks and a finished home nearly! Skeptics said it'd take 12 weeks just to do the domes - we doubled this expectation, and never pushed it - just worked solidly. Of course, the volunteer labor helped, but it was actually quite minimal in its direct result. Though I do believe so many eyes and participants did create a motivation for the crew workers to perform fast and quality work.
While ventilation has been the most inspirational challenge of our design, I was unprepared for the enormity of this windscoop. But we have finished it completely - and did so with humor and safety. Safely because it ended up about 35 feet high and it's weird tamping bags at that height! When we altered our plans for the scoop back in early January , I was gung-ho, thinking, 'well, if we're gonna do it, let's do it boldly'. I have had a few reservations since. When the idea for the 'scoop was first considered to be placed on top of our main dome, I thought it'd ruin the 'sight lines' of our dome. So, we designed it low, between the bedroom dome and main dome. Well, this scoop is now a MAJOR piece of the architecture, as we kept it 27" of usable interior space the entire way up. Which means any adult or kid now has an interior climbing gym as well as a natural air conditioner.
Was it worth the extra days it took us to build this monster? And will folks like this snake crawling up the main dome and reaching its head so aggressively into the sky? Will I actually play many tunes from its top? Time will tell...but we did it boldly! This was the last of our bags to be laid, so we have now COMPLETED the 3 domes, bathroom, and shower complex. 5 domes in 8 weeks. I am proud of the building team and those who supported us with advice and enthusiasm.
The last few days were 18 hour days - getting my 'checklist' of finishing items ready; choosing tile and paint colors; rounding up the final pieces needed to make my vision a reality. I was able to get my niche designed as I desired with 3 cool tiles; my bookshelf; knocked out of the wall; comerro ('dining room') tree got planted out front as desired; the plaster is nearly done inside & out - rough coat at least; windows and are ordered; stairs to the beach; a sitting bench laid out. It was a lot of work, but I feel good that I gave it my all. And so many folks were able to participate - in person and vicariously through this blog. A project I'll always remember...in a place that holds my heart. Viva la Casa De Los Domas! Wrapping up the Hootenanny: 3/19/09
The kitchen was basically done, but no stove, refrigerator, or dish washer had been installed - in fact, none of the concrete sealing had been done either. But after I passed through the 'downer' phase, I was inspired by the quality of the domes, their peaceful stance on the coast, and the cavernous sound they produce for rock and roll guitar playing.
When completed, Ill post a series of good pictures of the home, because now it certainly feels like home. It's really cozy. I figure I can get this home ready for any family with another 3-4 days of labor. Here's to the last days of this long, strange trip! In peace, Jeff
Bienvenidos a Casa De Las Domas: 3/24/09 I must say, building with earth bags is a good idea, but ultimately, I've come to realize that building a modern house is a multi faceted and complex affair, requiring the skills and/or tutelage of many good folks. I have a deeper appreciation now for the craft. The windscoop ROCKS! While it's not the heat and stillness of summer yet, the long 90+ degree days of March were plenty to test the differing ventilation options of the windscoop, playing doors and windows to differing effects. I'm more than happy with the endless options for creating breezes this technology affords. Working In Mexico . The hard work of my Mexican co-workers was inspiring, to say the least. Each day started at 7 am, and most everyone worked consistently and strong throughout the day. And attitude! I can tell you, getting a smile and warm reaction from the folks I worked with was as easy as asking for it. This is a polite and quiet society, and I was given nothing but respect, and leave with the same. I made the project under time, a little over budget, and significantly more happy with the result than I had envisioned. So, I'm a happy man. And proud to welcome all of my friends and family to come and experience an earthbag home on the Baja coast. |
 Jeff, Kate, and Eli, with the help of about 48 friends and family as well as the community of El Cardonal and various other locales around Baja Sur, built an earthen home using 'SuperAdobe'. Here is their story:
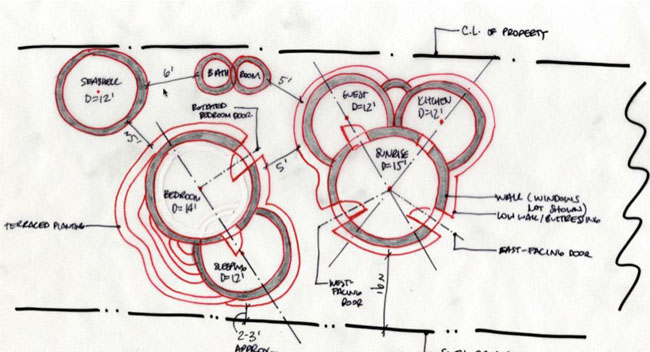
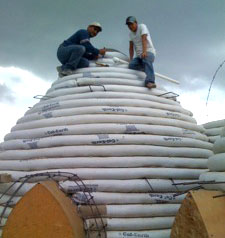
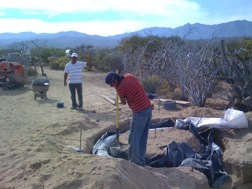 We finally started! Kate, Eli, and I had been down here for 5 days, staying at the HideAWay, and catching up with the locals and meeting new ones. Our building team, led by Ricardo, consists of maestro Isidro, his son Ganzago, and two helpers Felipe and Arturo. They arrived in the morning, and I shared with them the unfortunate reality that our site plan, developed by Jenille, had assumed the bathroom was free-floating. But the bathroom actually installed by Jose Martin and his crew was quite fixed onto earth. So, after a couple days of consultation with Jenille about ways we could alter the site plan, we simply decided to move the bathroom. I was amazed, the crew took to the task, and within hours we'd up-rooted the bathroom, moved it 11 feet west. We were able to lay foundation for the outside bathroom and improve its design with Ricardo's input. Then, we got the center points laid out for the Sunrise dome (no easy task - that requires skill, thank goodness Ricardo and Isidro have done this before), prepare bag and wire rolls for easy of use, get the water pump hooked up, connect to electricity from a neighbor (classic Mexican solution of simply 'tieing in' to the neighbor's meter) and we we're up and running - on our first day. Dome layouts, water, power, and bathroom foundation done. All in a day's work!
 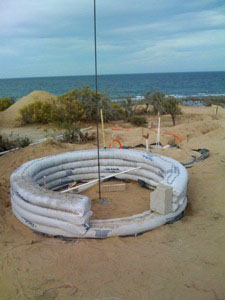 First dome begins to take shape: 11/25/08
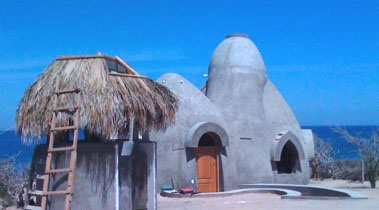
  We chose an outdoor bathroom complex, and it's looking cool! The bano is a 6 ft radial earthen domed wall built with 14" bags, standing 5; high from floor (with 3 bags under ground as foundation. The shower is the same). The two structures are tied together with horizontal bags of 2 feet (for the sink and cabinet, where we'll store things and where the hot water heater will go). A strand of bar wire ties the 3 structures together.
  We've done our soil analysis (yep, pretty perfect - about 10% clay, lots of small and medium sized sandy particles). We decided after 3 different 'concrete' tests that a 10% cement mix to 90% local earth mix was perfect.
 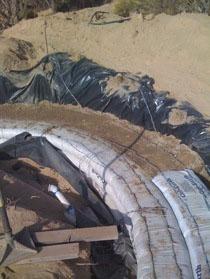 We decided to 'go down' into the earth to level with the patio area. Jose Martin's backhoe had leveled on a raised dais. Our builder, Ricardo, wished to stay high, as it's common in Mexico to ALWAYS go up and use a retaining wall. And, honestly, the view is best up. But earth homes like to be nestled into the earth, and so we dug down.
  Forms and footprints: 12/4/08
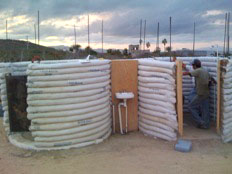
 Window forms and windscoops: 12/9/08
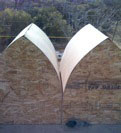
 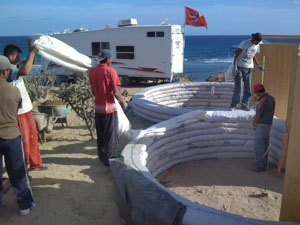 Our day in La Paz on Friday had equipped us for window and outside water heater/satellite kiosk builds. So, the team took to wood work and we knocked out 4 forms (pictured here, which are simply 'space fillers' for final windows). These forms will allow us to build up the sunrise and guest domes, and then re-use 3 of the forms for the 3 windows in the kitchen.
 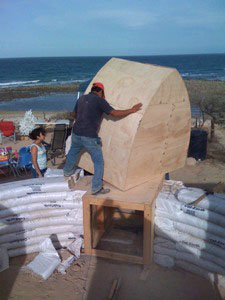 Keyhole Door: 12/11/08
 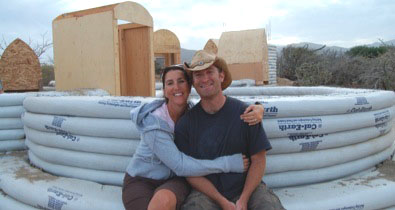 Walls Are a Rising: 12/13/08
 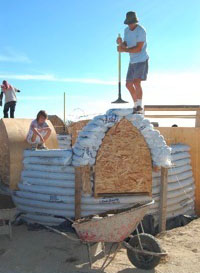 Earth bag arches are a lot of work: 12/16/08
 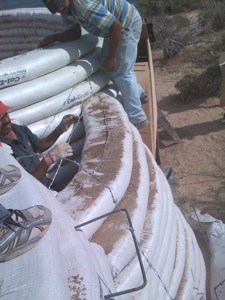 The windscoop is one of my favorite design features, as it is both a visually striking 'snake like' creature crawling up the Sunrise dome, and also a natural air conditioning system. The tube-like feature shown above was intended to be built on the bedroom dome, so that it bent around between the Sunrise and Bedroom domes. But with some pondering - and advice from our structural engineer, Elika, who was here for a week - we altered the design.
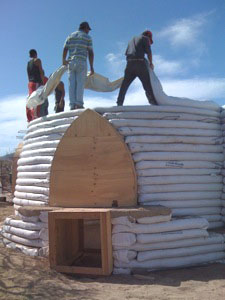 I knew I wanted round windows to allow star gazing at night. But the position had to be 'solar smart', so that we didn't introduce heat during the day. Only east and north facing. But should they open or not? Opening a'skylight's present a serious sealing issue, as the likelihood of pooling water is high in a vertically oriented window. And in a second home, lots of leakage can occur before anyone realizes it...
 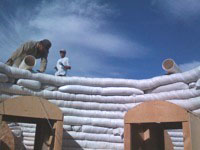 Merry Christmas: 12/25/08
  First experience with plaster: 12/28/08
 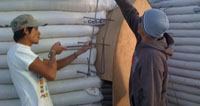 Lancet Arch 'Eyebrow' Windows: 1/2/09
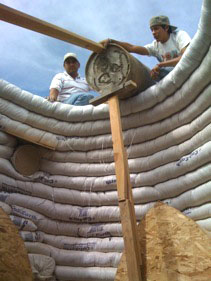
 Two of 3 domes are now done. The 'star gazing' windows we chose to place in are coming out awesome, and we'll finish closing the main sunrise dome this week for sure.
 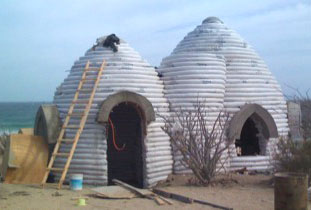 While the house is not finished, the 3 domes have been closed, all forms taken out, all door and window 'eyebrows' ready. The openness created by the big windows, doors, and 'star gazing' windows is amazing. This place cannot be conveyed electronically - it has to be 'felt'. For an earthen home, our design worked as wanted- earthen strength, sea welcoming. It is a major thrill.
 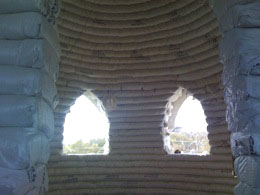 At the Cal Earth apprenticeship, I learned to use a water proof primer (Henry 107) that is an ashpalt emulsion. I think I recall it's best applied directly to the bags, prior to a scratch coat of plaster. What I'm not sure is if it's best to remove the bag from the 'fortified earth' block for application, or is applying to the actual bag is adequate? Related to this question, we then apply the actual water proofing 'roof cement' (Cal Earth recommended (Henry 203) to what we primed. Again, my assumption is we'll do this to bags directly, over the primed surface. Since we are in Mexico and there is no Henry products, I am using a Mexican equivalent - one layer for primer (mixed with water) and then direct application after primed layer. I'll let ya know it's 'veracity' once used.
 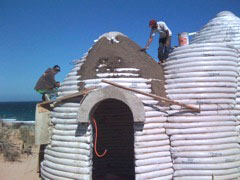 My other question is about long term plaster success. I am working with a Mexican crew - and they have a LOT of experience with plaster. But they also tend toward 'traditional' solutions. My builder thinks we'll get MUCH better longevity if we do a scratch coat of plaster to the bags, to get a roughly 'plumb' surface. Then, this cures for a day or two. Then another scratch coat to build up a couple of inches; then a final finish coat. At Cal Earth, we were taught to that one thick, rough coat application, nice & thick, and then a finish coat is adequate. If I go with my builder's advice, I do 3 coats; with Cal Earth's advice it's only two coats. The difference is a lot of time, labor, and cement.
 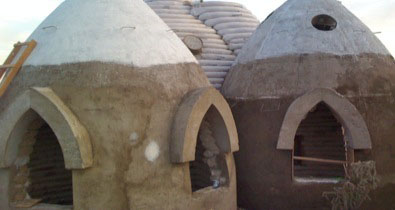 After some great feedback about what do, we went with a primer layer of water proofing over the scratch coat, and then a solid layer of 7 yr waterproofing (white colored). Then one more light coat of plaster for good wear & tear. Then we'll do a final coat later this year.
 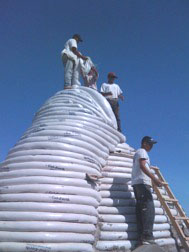 The Windscoop - and expensive air conditioner: 1/18/09
 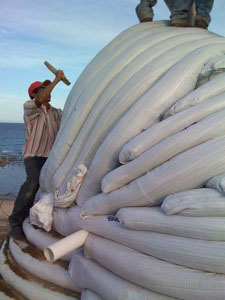 Look at the careful way we created a 'leaning arch' from the flat surface of the windscoop to get it to climb, rise vertical, and open its mouth to the winds? Pretty darn good bag work!
 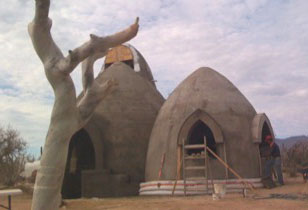 Well, here I am leaving my project. I gave it my all for the 8 weeks I had available. And I return home feeling tired, strong, and happy that I built my first home! And what an inspiring place it is. These pictures don't do it justice, you just have to come and experience it.
 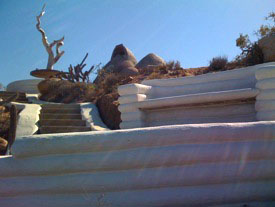 Back to El Cardonal after 8 weeks of being in touch only through sporadic emails and phone calls. I was nervous about coming back, trying to keep expectations to a minimum, but secretly hoping for a miracle - that all the contractors I'd hired had done their work. As you might guess...that didn't happen. I was ecstatic upon my arrival, as some of the finishing touches I'd forgotten about had been done beautifully: the table surrounding the 'brined' elephant tree; the elegant stairs to the beach Ricardo's crew had built; the gorgeous sitting bench for half way down our cliff; the traditional sink Kate had bought installed; the palapas over the bathrooms. There was a lot to love, and I was thrilled.
 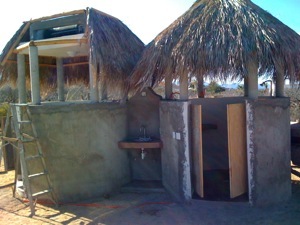 But it also looked like a construction zone, with the window guys still installing the windows (which turned our remarkably beautiful - the project took 5 full days of on site work for 2 guys as each had to be custom built. Much more work than they'd quoted for).
 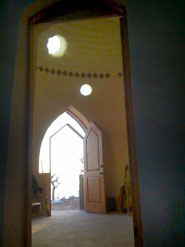 I have spent the last 2 days wiring ethernet and phone lines; connecting the gas lines to the stove (took 24 hrs to get a cuppa or hot food); retrofitting the refrigerator to better sit against a curved wall; and cleaning and cleaning! The entire property had amazing amounts of garbage on it, and I collected nearly 1/2 box full of screws and nails from the ground. Now Eli can walk barefoot anywhere!
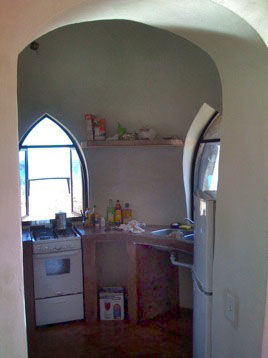 4 months after embarking on a grand adventure - The Hootenanny in Baja - I can say it's an unqualified success. We have a beautiful, safe, and inspiring home in a wonderful community on a lovely sea. Welcome to the finished home!